
1200 руб. за фотоотчёт
Платим за фотоотчёты по ремонту авто. Заработок от 10 000 руб/мес. Пишите:
Прокачать тормоза с АБС ничуть не сложнее, нежели делать прокачку традиционной тормозной системы автомобиля. Но чтобы правильно удалить воздух из тормозной системы, на котором установлена система ABS, рекомендуется разобраться с принципом и схемой её работы именно для вашего авто. Поскольку в зависимости от модели схема прокачки может незначительно отличатся. К примеру, когда блок гидроклапанов и гидроаккумулятор с насосом находятся в одном узле, то, что замена жидкости, что прокачка тормозной системы с АБС будут производиться по аналогичной схеме, как и прокачка тормозов без АБС.
Типы систем АБС
- ABS включает: блок гидроклапанов, гидроаккумулятор, насос (прокачивается в гаражных условиях);
- Насос, гидроаккумулятор и блок гидроклапанов размещены по разным узлам, такая тормозная система кроме модуля ABS включает в себя и дополнительные модули ESP, SBC (прокачивается в условиях СТО). Необходимо иметь диагностический сканер чтобы контролировать клапана модулятора.
Исходя из особенностей, можно сделать вывод, что прежде как прокачать тормоза с АБС определитесь с типом именно вашей системы так как данная инструкция будет актуальна лишь для стандартной антиблокировочной системы.
Процесс прокачки тормозов с АБС
Дабы качественно выполнить поставленную задачу желательно производить прокачку с помощником, начиная прокачивать тормозную систему с передних колес, затем задних (правое и левое).
Сброс давления происходит методом разрядки аккумулятора давления. Для этого выключите зажигание и около 20 раз нажмите на педаль тормоза. А затем для перехода к следующему этапу прокачки тормоза отключите разъемы на бачке с тормозной жидкостью.
Общий принцип как прокачать тормоза с АБС
- Находим и извлекаем предохранитель в блоке отвечающий за работу АБС;
- Откручиваем колесо и находим штуцер РТЦ для прокачки тормоза;
- Начинаем прокачивать тормоза с абс при выжатой педали;
- Включаем гидравлический насос (включив зажигание, на приборной панели загорится лампочка АБС) и ждем пока весь воздух не выйдет;
- Закручиваем штуцер и отпускаем педаль тормоза, если лампочка АБС больше не горит – все сделано правильно и воздух полностью вышел.
Последовательность удаления воздуха из ТС
Начинаем прокачивать тормоза с переднего правого, а потом левое. Процедура происходит при выключенном зажигании (положение на «0») и снятой клемме на бачке ТЖ.
- Надеваем шланг, с бутылочкой, на штуцер и открываем его (рожковым ключом). Надавать нужно именно прозрачный шланг, чтобы было видно пузыри воздуха, а также другой конец шланга должен быть полностью помещен в жидкость.
- Выжимаем полностью педаль и держим, докуда не выйдет весь воздух.
- Закрутить штуцер и отпустить педаль как пойдет жидкость без воздуха.
Задние колеса прокачивается с включенным зажиганием на положении ключа «2».
- Как и при прокачке передних колес надеваем шланг на штуцер для прокачки на суппорте.
- Выдавив полностью педаль, поворачиваем ключ зажигания (чтобы запустить гидравлический насос). Наблюдаем за выходом воздуха и контролируем уровень тормозной жидкость в бачке (периодично доливаем).
Чтобы правильно прокачать тормоза с абс на заднем левом колесе последовательность действий нужно немного изменить.
- Как в предыдущих случаях сначала надеваем шланг на штуцер и откручиваем не полностью, а только на 1 оборот, причем педаль не нужно выжимать.
- Поворачиваем ключ зажигания, чтобы запустить гидравлический насос.
- Как только воздух выйдет, выжимаем тормозную педаль до половины и закручиваем прокачивающий штуцер.
- После чего отпускаем тормоз и ждем остановки насоса.
- Выключаем зажигание и подключаем снятый разъем с бачка.
Если прокачивать тормоза нужно вместе с модулятором ABS то информацию по такой процедуре можно посмотреть тут.
В обязательном порядке после того как прокачали тормоза прежде чем выезжать нужно проверить герметичность системы и отсутствие подтеков. Контрольно проверить уровень тормозной жидкости.
Система тормозов с АБС предназначена для того, чтобы предотвращать блокирование колес, если происходит экстренное торможение. Основная функция АБС – регулирование скорости вращения колес автомобиля во время торможения. Регулирование происходит за счет разного давления в тормозной системе каждого колеса.

Процессом управляет электронный блок управления, на который поступают сигналы от датчиков, которые установлены на колесах. ЭБУ самостоятельно принимает решение о нужном давлении в определенный момент движения. Реакция системы в сотни раз быстрее, чем самая быстрая реакция водителя на ту или иную ситуацию. Тем более, что водитель может опираться только на свои ощущения, а не на показания датчиков.
Хотя система тормозов с АБС достаточно надежна, рано или поздно может возникнуть ситуация, когда нужно будет их прокачать. И сегодня мы постараемся ответить на вопрос о том, как прокачать тормоза с АБС.
Основные узлы системы АБС
• Электронный блок управления (ЭБУ). Это, так сказать, мозг всей системы, который реагирует на сигналы, поступающие с датчиков. ЭБУ, получив нужные параметры, принимает решение о том, что делать дальше, и отправляет электронные импульсы на исполнительные элементы тормозной системы (управляющие клапаны).
• Управляющие клапаны получают сигналы от ЭБУ и формируют нужно давление в тормозных магистралях системы.
• Датчики, которые замеряют параметры движения колес и отправляют их на блок управления.
Особенности прокачки тормозов с АБС
Прокачка тормозов с АБС потребует от владельца автомобиля определенных навыков и знания устройства своего авто. Без знания, где и что находится, или без умения читать техническую документацию, в том числе и чертежи, можно даже не пытаться заниматься прокачкой тормозной системы с АБС самостоятельно.
Некоторые виды тормозных систем прокачать в условиях гаража не получится. Слишком много электроники и слишком тонкие настройки этой электроники не дадут возможности выполнить эту операцию самостоятельно. И тогда прямая дорога в соответствующий сервис.
Существует несколько систем компоновки тормозных систем с АБС. И каждая имеет свою специфику прокачки.
Если компоновка тормозной системы предполагает, что все узлы системы расположены в одном блоке, тогда технология прокачки ничем не отличается от технологии прокачки тормозной системы без АБС.
Как прокачать тормоза с АБС в этом случае:
Система в этом случае отключается путем удаления предохранителя. Или выполняется отключение предохранителя (если такое предусмотрено конструкцией).
Далее нужно открутить штуцер прокачки РТЦ. Контур тормозной системы прокачивается при нажатой педали тормоза. Далее включается зажигание автомобиля, и начинает работать насос, который выдавливает воздух из магистралей контура тормозной системы.
После этого штуцер закручивается на место. Индикатор нерабочей системы АБС должен потухнуть, хотя перед этим он должен был гореть.
Следующая компоновка тормозной системы с АБС предполагает, что узлы системы разнесены. Т.е. гидромодуль с клапанами, гидравлический аккумулятор находятся в разных местах.
Такую систему можно диагностировать только при наличии специального сканирующего устройства, которое есть только в специализированных сервисах.
В сервисах выполняется прокачка тормозной системы, если еще установлены системы ESP или SBC. В условиях гаража невозможно прокачать тормозные системы у автомобилей с этими опциями. Слишком все там сложно для неискушенного автолюбителя.
Алгоритм прокачки тормозов с АБС
Прокачка тормозов с АБС должна выполняться вдвоем. Сначала прокачивается система на передних колесах, а затем на задних. Система каждого колеса прокачивается по очереди.
• Разъемы на крышке тормозного бачка должны быть отсоединены.
• Следует понимать, что в тормозной системе существует большое давление. И на первом этапе нужно это давление снизить, т.е. практически уравнять с атмосферным. Для этого при выключенном зажигании нужно около 20-ти раз нажать на педаль тормоза.
• Нужен отрезок винилового, желательно прозрачного шланга, который по диаметру подходит для штуцера. Прозрачный шланг нужен для того, чтобы проверять наличие воздуха в тормозной жидкости.
• Шланг надевается на штуцер, и штуцер открывается на один оборот. Штуцер находится на суппорте колеса.
• После этого нужно нажать на педаль тормоза и удерживать ее в таком положении. В это время помощник контролирует выход воздуха из системы. Все это видно в прозрачной виниловой трубке. Процедуру с нажатием педали тормоза следует повторять, пока не исчезнут воздушные пузыри.
• После этого штуцер закрывается, и педаль тормоза отпускается. Далее переходим к следующему переднему колесу. Далее переходим к задним колесам. Сначала к правому заднему колесу.
• Прозрачный виниловый шланг надевается на штуцер на суппорте, и штуцер открывается на один оборот. После этого нажимается педаль тормоза, и ключ зажигания поворачивается в положение «2».
• Начинает работать насос тормозной системы. Тормозная жидкость начинает вытекать из виниловой трубки, и при этом в ней есть воздух. Педаль тормоза все время удерживается в нажатом состоянии.
• После того, как пузыри в жидкости исчезнут, штуцер закрывается, и педаль тормоза можно отпустить.
• Дальше следует переходить ко второму заднему колесу. Все происходит по такому же алгоритму, только педаль тормоза не нажимается. Жидкость вытекает из винилового патрубка под действием работы насоса. Такое движение тормозной жидкости должно продолжаться, пока в жидкости не исчезнут пузыри воздуха.
• Следующий важный момент – педаль тормоза нажимается до половины и после этого закручивается штуцер на суппорте. Только после этого педаль тормоза отпускается.
• Далее автомобиль глушится и выполняется соединение разъемов на бачке.
Теперь вы знаете, как прокачать тормоза с АБС. В завершение один важный момент. Во время выполнения работ по прокачке тормозов с АБС, нужно следить, чтобы насос не работал без жидкости. И он не должен работать больше двух минут. Если воздух не успевает выгнать за это время, насос останавливается и затем весь цикл повторятся вновь.

How to check the car generator yourself reference 1
How to test the DMRV with one’s own hands reference 2
Bleeding the brakes with ABS taking into account system features ↑
Bleeding the braking system has never been something very difficult and problematic for motorists, doing this work took an average of 1.5-2 hours. However, with the advent of cars with the ABS system, the task has become much more complicated, and the question of how to brake brakes from ABS is that most drivers can not answer. Therefore, pumping the brake system with ABS will require you to have some technical skills. In addition, it will not be superfluous to pre-examine the manual for the installation and maintenance of your car’s brake system.
The process of bleeding the braking system with ABS can not be called time consuming or complicated, the whole problem is that you need to know the sequence of doing this work and then everything will turn out.
Features of bleeding ABS brakes :
• in cars that have a hydraulic valve, a hydraulic accumulator and a pump in one unit, a brake fluid replacement and bleeding of the brake system with ABS is performed similarly to pumping the brakes on a car without ABS
To pump this braking system to the ABS, do the following:
1. Locate the fuse that is responsible for the operation of the entire ABS system and remove it from the socket. This will turn off the system completely.
2. Unscrew the RTC choke (service brake cylinder) and proceed to bleeding
3. Prorolling of brakes with ABS is performed with the pedal depressed, to check the action, switch on the ignition, the ABS fault indicator on the instrument panel will light up. (Do not unscrew the union with the brake pedal released)
4. Turn the ignition on and wait for the pump to completely expel the air from the system.
5. The bleeder is tightened and the brake pedal is released
6. The bleed screw is tightened and the brake pedal is released
7. When the light goes out — this will mean that the system is correctly pumped.
• Bleeding the brake system with ABS in which the hydronic module with valves and the accumulator are separated by separate units is carried out using a diagnostic scanner to remove information from the ABS computer. It is unlikely you have it. Therefore, the pumping of brakes with ABS of this type is most likely to be carried out by you in the service station.
• Bleeding the brake system with ABS and with electronic activation systems (ESP or SBC) is performed only under service conditions.
However, how do I pump the brakes with this ABS? ↑
It is important! It should be remembered that the pressure in the braking system reaches 180 atm. Therefore, to exclude the ejection of the brake fluid, before disconnecting the brake lines of any system with ABS, it is necessary to discharge the pressure accumulator. For this, with the ignition off, press 20 times the brake pedal.
Brake system with ABS
Bleeding the brakes with ABS, as well as pumping the conventional braking system, is performed with an assistant. Switch off the ignition (position "0"). Disconnect the connectors on the brake fluid reservoir.
Front wheel brakes:
Ignition OFF
• put the hose on the bleeder;
• Open the choke for a turn;
• the brake pedal is pressed to the stop and held in the squeezed position;
• observe the output of the "air-blown" mixture;
• When the bubbles run out, tighten the nipple and release the pedal.
Rear right wheel brake :
• put the hose on the bleeder, unscrew it for one turn;
• Press the brake pedal all the way
• Switch on the ignition, do not release the brake pedal
• A working pump will expel air from the system. That is, as soon as the brake fluid starts to exit without air bubbles, block the union and release the brake.
Now it’s the turn to pump Left rear wheel brake
• put the hose on the union and unscrew it for 1 turn;
• DO NOT depress the brake pedal;
• the working pump pushes the "air-blown" mixture;
• Press the brake pedal halfway and tighten the fitting;
• Release the pedal and wait for the pump to stop completely.
• Switch off the ignition, connect the connectors to the tank TG.
On completion, check for leaks, make sure the brake system is sealed. Add the brake fluid to the tank to the required level. This pumping brake with ABS can be considered complete. Assemble the tool, wash your hands and check the operation of the brakes in motion. Be careful, do not overclock fast, first check the brakes at low speed.
ABS: WHY IT NEEDS
It is known that if the front wheels are blocked during emergency braking "on the floor", the car becomes uncontrollable. Turning the steering wheel in this case is completely useless. Experienced driver brakes intermittently, letting the wheels turn, which allows you to taxi in the right direction and, maybe, drive around the unexpectedly encountered obstacle. But do many of us have enough self-control even for a moment to ease the pressure on the brake pedal, when the car with a squeal flies, perhaps, in its final path?

Fig. 1. Functional diagram of ABS Teves Mk II: 1 — hydraulic pump; 2 — pressure accumulator; 3 — ECU; 4 — wheel sensors; 5 — the block of electromagnetic hydrovalves.
What is difficult for a person is beyond the power of impassive electronics. And already on the blocking of the wheels the pedal responds with frequent sharp jerks, which shows: ABS works, and now you have the opportunity to turn away from danger!
ABS: HOW IT DONE
In Fig. 1 shows the functional diagram of a typical ABS. We immediately pay attention to the electric pump 1 and the pressure accumulator 2: these components are necessary for intelligent electronics to be able to control the braking force regardless of the reaction of the driver (recall — in an emergency, it usually just presses the pedal "to the stop"). In addition, the electronic control unit 3 (ECU) must "know" whether the wheels are rotating at this time and at what speed. This information is provided by the sensors 4, which control each wheel. After all, there may be a situation where a slippery road surface under one of the wheels provokes its early blockage. Then the ECU, at the signal from this wheel, issues a command to loosen the braking force, preventing skidding and turning the car. True, while the stopping distance will be as if all the wheels were on a slippery road. But the developers believe that it is more important in any case to maintain controllability and maneuverability.
The last of the ABS assemblies is a block of electromagnetic valves 5, which, in fact, control the fluid pressure. In each of the circuits of the brake system, two valves are provided — the inlet valve, which opens the way of the liquid from the pressure accumulator to the working cylinder, when it is necessary to increase the braking force, and the outlet that allows the liquid to go back to the tank when the pressure has to be relaxed. These valves with a working ABS either open alternately, or closed, if the pressure in the circuit should remain unchanged. Finally, it is important to know that in the de-energized state, the intake valves are open, and the exhaust valves are closed. This allows the ABS to simply turn it off (for example, by removing the fuse F54 (Figure 2) or removing the connector from the computer) and braking, as in a conventional car.
ABS: IN CASE AND IN DISEASE
A schematic diagram of the ABS joints of the Teves company installed, in particular, on the Volkswagen-Passat cars of the 1990 release as additional equipment, is shown in Fig. 2. As you can see, it is not too complicated. And nevertheless, it is worthwhile to make some important remarks for those who dare to repair ABS themselves.
1. Before removing the battery and carrying out welding work on the vehicle, be sure to disconnect the plug connector from the ABS computer with the ignition off. This block in the "Passat" is located under the pillow of the rear seat.
2. When performing painting work, the computer should not be exposed to a temperature of 85 ° C for more than two hours.
3. Before any work on the brake system, discharge the pressure accumulator by pressing the brake pedal at least 20 times with the ignition off, otherwise the system will retain a pressure of about 180 atm.
4. Be careful, including ignition when the hydraulic system is depressurized, as in this case the brake fluid pump will work.
Now let’s start checking the ABS nodes. For workers of service centers, readers are issued that allow you to remove information from the self-diagnosis system. The thing is expensive and almost inaccessible to car enthusiasts. We will dispense with the usual radio amateur tester, which measures the voltage and resistance in electrical circuits. Connect the leads of the device to the contacts of the computer connector, which requires accuracy and skill. Therefore, most of the checks will be performed with the ignition off and the computer connector removed, then the tester can be easily connected to the pins of the pad on the wiring harness. So, we study the ABS test table.
Let’s explain the rules of using the table. Measure the voltage or resistance between the terminals of the computer in the second column of the connector of the computer-ABS in the terminal block located on the wiring harness. In this case only pp. 35-40 check with the computer connected, otherwise the connector is removed. The last column indicates the possible cause of the malfunction if the measurement results do not correspond to those indicated in the fifth column. In this case, we consider only the cases of defects in the nodes of the system, assuming that the electronic unit is functional. This is all the more justifiable, that the repair of the computer in the home is impossible, and it is entirely possible to replace a whole assembly with a handy and sharp-witted motorist. If you do everything correctly, then the ABS warning lamp on the instrument panel will go off after a short time after the ignition is switched on — as it should be with a working system.
Which electrical circuit corresponds to reality, I can not say (did not penetrate)
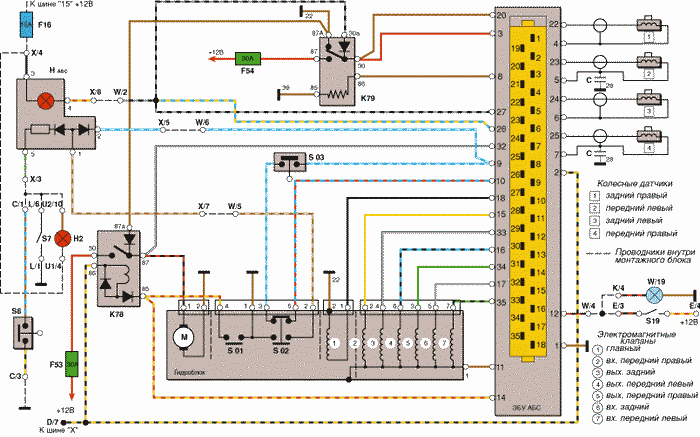
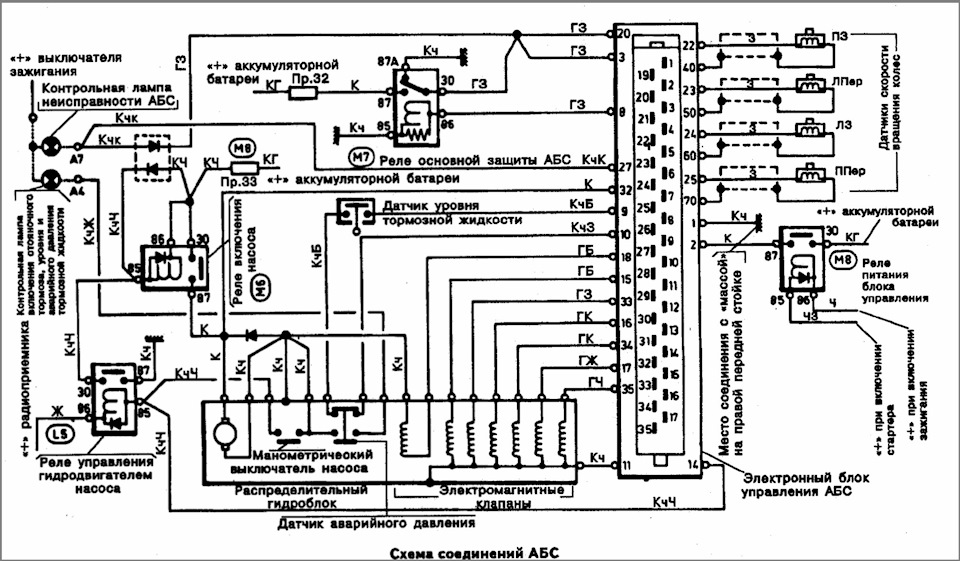
Fig. 2. Schematic circuit diagram of ABS connections Teves Mk II. The notation from the Latin letter and number (for example, W / 2 or U2 / 10) indicates the connector in the fuse and relay block (letter) and its contact (figure). The figure near the point of connection with the "mass" shows the location of this connection in the car (22 — on the hydraulic unit, 28 — on the engine compartment partition, 39 — under the pillow of the rear seat on the left). Fuses 53 and 54 are installed directly under the corresponding relays above the main part of the relay and fuse block. The numbering of non-ABS units corresponds to the Volkswagen-Passat scheme in the RA, 1998, No. 10.
And in conclusion — several recommendations for replacing the nodes. Let us reiterate that before releasing the hydraulic system it is necessary to relieve the pressure in its accumulator by pressing the brake pedal 20 times with the ignition off. The pumping of the circuits connected to the pump has its own peculiarities. So, you put a transparent tube on the choke and lowered its end into a jar with brake fluid. Now press the brake pedal, unscrew the bleeder and turn on the ignition. This will turn on the ABS pump, which will expel air from the system. As soon as the bubbles cease to emerge, release the pedal, tighten the connection and turn off the ignition.
Before installing the new wheel rotation sensor, apply a layer of grease to the surface of the seat and install a new O-ring.
Of course, the ABS of other models is different from the one described above and the fault table to them may not be suitable. But the general principles of building systems are the same, and if you can find an ABS scheme for your machine, then, comparing it with Fig. 2, it is also easy to correct the diagnostic table. Therefore, our recommendations, we hope, will be useful in any case.
